Welcome! Photoshop can be a very intimidating program when you don't know where to begin... I created this blog to hopefully help people who need a basic starting point for their editing workflow. These tutorials were created in Photoshop CS3 but Elements users should be able to follow them as well. I hope they are helpful! :c)
Tuesday, October 30, 2007
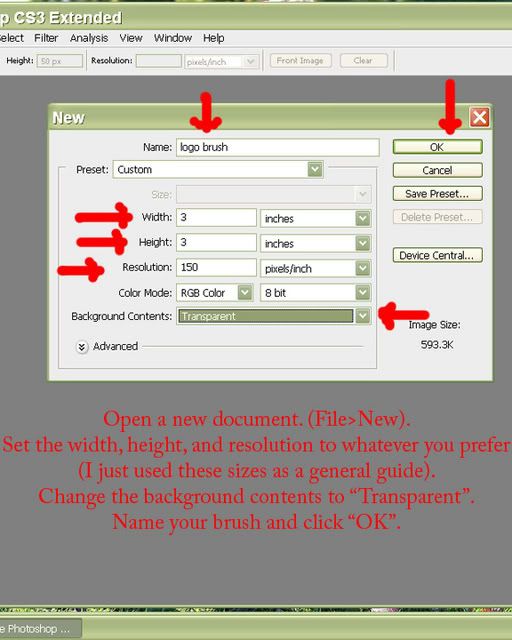
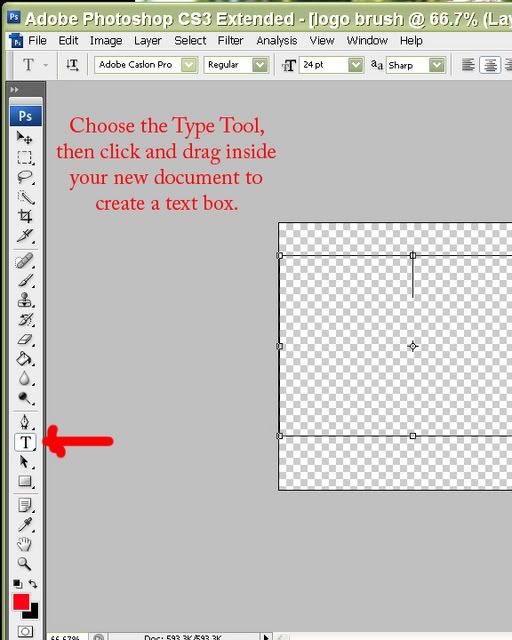
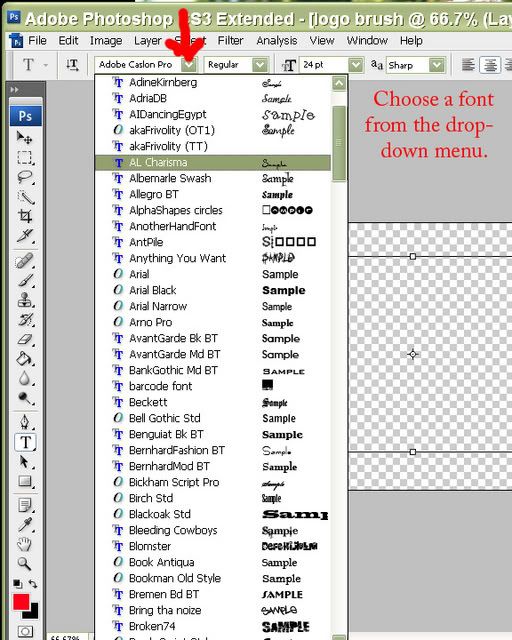
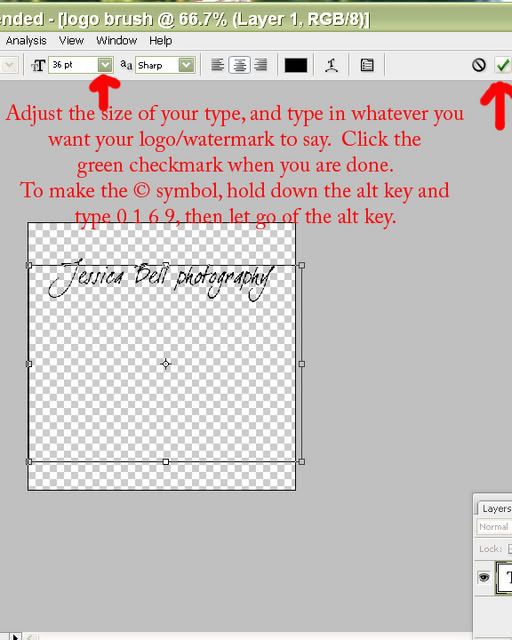
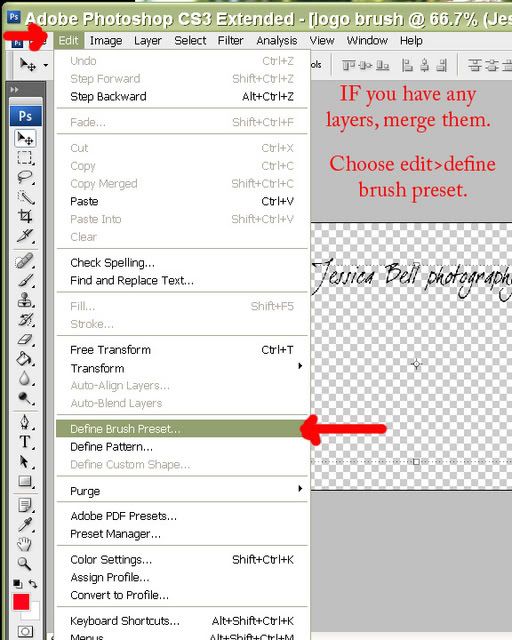
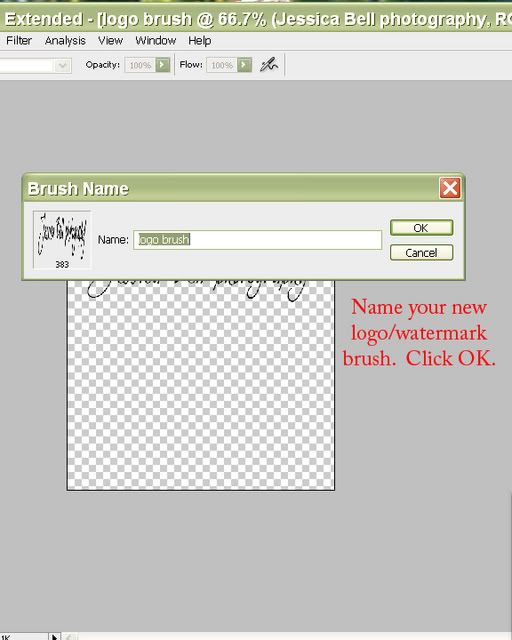
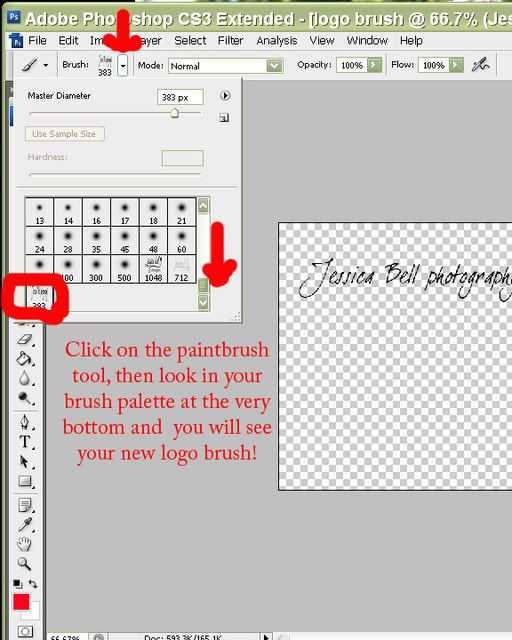
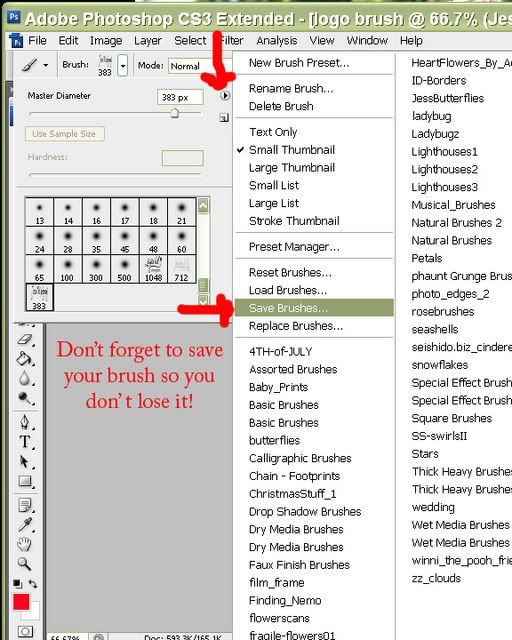
How to make a logo brush/ watermark brush/ copyright stamp
Whatever you want to call it! LOL!
To use your new logo/watermark/copyright brush, just choose that brush from your brush pallette, change the opacity at the top of the screen (if you wish), adjust the brush size, and click on your photo to "stamp" your logo on!
THANK YOU for having info like this on your blog. I lurk on two peas and notice the link to your photoshop blog. Can't wait to I have time and can check out your photography blog!
I'm just venturing into finally getting out of auto, and working in av mode. I have some first pics posted on my blog. Haven't really messed with photoshop yet but plan on too.
Thank you thank you! That was an awesome post! I totally needed that tutorial. SO much easier than the way I was doing it before.
I noticed that on your pictures, you sometimes use a watermark that is a white, transparent band across the image with your logo written on the band. How would I do that? Could you make a tutorial on that?
THANK YOU, THANK YOU, THANK YOU!!! You don't know how long I've been looking for instructions to do this. Everyone I talked to said I would have to type my copyright on each picture. I knew there was a way to do it, because I did it in PS 7.0 a long time ago. Now I'm using CS3 which is much more advanced. This helps me so much...Thank you again and keep posting these helpful tips!!!
Thank... have been working on making this brush for some time but without luck.
Only problem I have with doing this is that I am working on a notebook so pressing Alt+0169 # keys will not create the copyright symbol. Do you know how I can make the symbol using other keys?
Thank you so much! I tried searching for a great tutorial for an hour but nothing could ever helped me but this one. It's amazing!!!! I'm so happy! I even made one for my brother and he's in awe lol.
This is AWESOME!! Thank you so much! I was just wondering if there is a way for the logo to be colored instead of black and white?! I create it in color, but it saves as black and white?! Thank you so much :)
I know that problem well! I really need to go through and re-organize my tags and categories on a few blogs I operate. I am going to try and limit my categories to about 10 areas, using tags to help further group my articles.iPhone Developers
This kind of information is very limited on internet. Nice to find the post related to my searching criteria. Your updated and informative post will be appreciated by blog loving people. Graphic Design
These are great! I clicked on these hoping you'd have a tutorial on how to add texture. Any chance you're working on one of those? cheap Hockey Jerseys
That's really amazing tutorial regarding making logo to the brush. Now I can able to make something different into the photoshop. It seems to have open source photoshop.
I'm having the same problem as someone else mentioned above. The option to 'define brush preset' is not lit up. The only option I'm given is to 'define pattern' & it's driving me bonkers. I've made 5 different watermarks, following the tutorial to a T just to make sure I'm doing it right & in every single one the option to define brush preset is not clickable. What am I doing wrong? Thanks
Ok, did some more research & figured it out! My selection was larger than the allowed brush size which is 2500. Thought I'd come back & add that just in case someone else came across the same problem. Thanks for a great site!
Thank you Jess for posting this simple watermark technique! I have been looking and all the others just made me shake my head sadly. Now I can do it, yay!!! And thank you to StaceyAnne above for pointing out the last bit :)
Thank you Jess for posting this simple watermark technique! I have been looking and all the others just made me shake my head sadly. Now I can do it, yay!!! And thank you to StaceyAnne above for pointing out the last bit :)
57 comments:
THANK YOU for having info like this on your blog. I lurk on two peas and notice the link to your photoshop blog. Can't wait to I have time and can check out your photography blog!
I'm just venturing into finally getting out of auto, and working in av mode. I have some first pics posted on my blog. Haven't really messed with photoshop yet but plan on too.
These are great! I clicked on these hoping you'd have a tutorial on how to add texture. Any chance you're working on one of those?
That was awesome! Thank you!
thanks so much for the straightforward tutorial. keep the great info coming! :)
christina
my blog!
Thank you thank you! That was an awesome post! I totally needed that tutorial. SO much easier than the way I was doing it before.
I noticed that on your pictures, you sometimes use a watermark that is a white, transparent band across the image with your logo written on the band. How would I do that? Could you make a tutorial on that?
THANK YOU, THANK YOU, THANK YOU!!! You don't know how long I've been looking for instructions to do this. Everyone I talked to said I would have to type my copyright on each picture. I knew there was a way to do it, because I did it in PS 7.0 a long time ago. Now I'm using CS3 which is much more advanced. This helps me so much...Thank you again and keep posting these helpful tips!!!
Thankyou so much for this!!
Yay..now I have a watermark brush!
Thank you, thank you!! I so appreciate your clear, helpful tutorial. I just linked it on my blog.
I just "stumbled" across this blog and am SOOooo happy!...YEAH! THANKS!
Thanks so much for this tutorial!
Oh Jess!
This is great I think I did it be accident!!! These things NEVER turn out for me....LOL but thanks to you I DID IT!!!!
Jeannie D
still peaing
Thanks, this was just what I needed!
Thank... have been working on making this brush for some time but without luck.
Only problem I have with doing this is that I am working on a notebook so pressing Alt+0169 # keys will not create the copyright symbol. Do you know how I can make the symbol using other keys?
Thank you so much! I tried searching for a great tutorial for an hour but nothing could ever helped me but this one. It's amazing!!!! I'm so happy! I even made one for my brother and he's in awe lol.
Thank you! But I can not get "define brush preset" in PS to show... what am I doing wrong? Please, help :)
Thank you! But I can not get "define brush preset" in PS to show... what am I doing wrong? Please, help :)
THANK YOU! This is awesome!
Lauren
Thank you soooooooooo much!!! This is amazing!
This is AWESOME!! Thank you so much! I was just wondering if there is a way for the logo to be colored instead of black and white?! I create it in color, but it saves as black and white?! Thank you so much :)
Thanks for the step by step help! It worked perfectly!
I don't know if anyone answered the question about how to generate a the copyright symbol using a laptop. Press alt, fn (function key) and then press 0169 numbers on the alpha keyboard, not the number row keys. For example, press alt, fn simultaneously and keep them pressed while you press the m, j, o, and 9 keys which take the place of the numeric pad on a laptop. ©
I just googled forever trying to find the tutorial for this... finally I found your site. Thank you for sharing this!
I just googled this and you were luckily the first hit so congrats and thanks!
Thank you soo much for this tutorial! It worked for me to use in in my PSE8!!! I'm so excited. God bless you.
Thank you, this helped me immensley
oops I commented with my daughters account. This helped ME immensley
This was SO incredibly helpful and well put together. Thank you very much!!!
Thanks SO much! This helped me a TON!
Fantastic!!!! thank you =)
I think that quite a few of us use the term stamp when it comes to these type of brushes ... as basically you just stamp down once with them.
Thanks for sharing with us...
social media melbourne
It's not giving me the option to define my brush preset... as in, it's not clickable. What's up with that?
I know that problem well! I really need to go through and re-organize my tags and categories on a few blogs I operate. I am going to try and limit my categories to about 10 areas, using tags to help further group my articles.iPhone Developers
This was a big help!! Thank you for taking the time to put it together.
This was the second time I've used this post... thanks so much for sharing with us!
Awesome post. Its really informative to make a look into it. Great content.
best seo forums
Great idea.. thanks for sharing... :)
Great idea.. thanks for sharing... :)
Thank you
Thank you very much
Thanks so much...Being PS illiterate, this was a huge help
http://www.freelancer.com/marketplace/product/Photography-Logo-2.html Photography Logo Layered PSD
Tool:Photoshop
Easy Editable
Includes in zip:-
-Psd file
-Font folder
http://www.freelancer.com/marketplace/product/Photography-Logo-2.html Photography Logo Layered PSD
Tool:Photoshop
Easy Editable
Includes in zip:-
-Psd file
-Font folder
So simply put! very clear instructions! ty
Thanks! Worked perfectly!
This kind of information is very limited on internet. Nice to find the post related to my searching criteria. Your updated and informative post will be appreciated by blog loving people.
Graphic Design
These are great! I click the hope that you will have a about how to add texture. Any chance, you work a man?
Cheap Nike NFL Jerseys
These are great! I clicked on these hoping you'd have a tutorial on how to add texture. Any chance you're working on one of those? cheap Hockey Jerseys
That's really amazing tutorial regarding making logo to the brush. Now I can able to make something different into the photoshop. It seems to have open source photoshop.
Captivate Training Tutorials
I'm having the same problem as someone else mentioned above. The option to 'define brush preset' is not lit up. The only option I'm given is to 'define pattern' & it's driving me bonkers. I've made 5 different watermarks, following the tutorial to a T just to make sure I'm doing it right & in every single one the option to define brush preset is not clickable. What am I doing wrong? Thanks
Ok, did some more research & figured it out! My selection was larger than the allowed brush size which is 2500. Thought I'd come back & add that just in case someone else came across the same problem. Thanks for a great site!
Thank you Jess for posting this simple watermark technique! I have been looking and all the others just made me shake my head sadly. Now I can do it, yay!!!
And thank you to StaceyAnne above for pointing out the last bit :)
Ross Charette
Thank you Jess for posting this simple watermark technique! I have been looking and all the others just made me shake my head sadly. Now I can do it, yay!!!
And thank you to StaceyAnne above for pointing out the last bit :)
Ross Charette
@@@ Indian Adult Porn Photo Blog @@@
@@@ Desi Aunties Naked Pictures @@@
@@@ Bollywood Actress Nude Photo Album @@@
@@@ Mallu Hot Indian Naked Aunty Pics @@@
@@@ Sexy Pakistani Girls Wallpapers @@@
@@@ Indian College Girls Pictures @@@
@@@ Hot Indian School Girls Photos @@@
@@@ Nude Busty Desi Aunties Boobs @@@
@@@ Hottest Bhabhi Hairy Pussy Gallery @@@
@@@ Desi College Girls Hidden Camera Nude Photo @@@
@@@ Indian Adult Porn Photo Blog @@@
@@@ Desi Aunties Naked Pictures @@@
@@@ Bollywood Actress Nude Photo Album @@@
@@@ Mallu Hot Indian Naked Aunty Pics @@@
@@@ Sexy Pakistani Girls Wallpapers @@@
@@@ Indian College Girls Pictures @@@
Is it okay to post part of this on my website basically post a hyperlink to this webpage? this
Post a Comment